Are you looking to display Microsoft Excel 2010 software on your desktop? CAR-REMOTE-REPAIR.EDU.VN provides a detailed guide on how to achieve this and enhance your skills, especially if you’re in the automotive repair industry. This article provides step-by-step instructions and tips to help you master Excel 2010 and leverage its capabilities for remote car repair diagnostics and data management. Learn to open Excel Starter, create spreadsheets, and utilize its features effectively.
Contents
- 1. Understanding the Basics of Microsoft Excel Starter 2010
- Key Features and Limitations
- Upgrading to Excel 2010
- 2. Opening Excel Starter 2010
- Understanding the Interface
- 3. Creating a New Workbook
- Using Templates for Automotive Tasks
- 4. Saving Your Workbook
- Best Practices for Naming and Organizing Files
- 5. Entering Data
- Tips for Efficient Data Entry
- 6. Formatting Data
- Formatting Tips for Automotive Data
- 7. Copying, Moving, or Deleting Data
- Efficient Data Management Techniques
- 8. Sorting Data
- Sorting Applications in Automotive Repair
- 9. Filtering Data
- Filtering Applications in Automotive Repair
- 10. Calculating Data with Formulas
- Formulas for Automotive Calculations
- 11. Creating Charts from Data
- Chart Examples for Automotive Repair
- 12. Printing Worksheets
- Printing Tips for Automotive Technicians
- 13. Sharing Workbooks
- Collaborating on Automotive Data
- 14. Getting Additional Help
- Additional Resources for Excel and Automotive Repair
- FAQ: Mastering Microsoft Excel 2010 for Automotive Technicians
- 1. How can Microsoft Excel 2010 improve efficiency in an auto repair shop?
- 2. What are the essential Excel functions that every auto technician should know?
- 3. Can Excel 2010 be used for remote diagnostics in car repair?
- 4. How do I create a repair log template in Excel 2010?
- 5. How can I track inventory using Excel 2010?
- 6. Is it possible to integrate data from diagnostic tools into Excel 2010?
- 7. What are some best practices for managing customer data in Excel 2010?
- 8. How can I use Excel 2010 to analyze repair trends?
1. Understanding the Basics of Microsoft Excel Starter 2010
What is Microsoft Excel Starter 2010, and why is it useful for automotive technicians?
Microsoft Excel Starter 2010 is a simplified version of Microsoft Excel, designed for basic tasks such as creating budgets, managing address lists, and tracking to-do items. Excel Starter is a pre-loaded component of Microsoft Office Starter 2010, making it readily available on many computers. For automotive technicians, understanding Excel Starter can be a stepping stone to managing data, creating repair logs, and organizing customer information efficiently.
Excel Starter 2010 closely resembles Microsoft Excel 2010 in appearance, providing a familiar interface for users new to the Ribbon interface or Backstage view. This familiarity makes it an excellent starting point before upgrading to the full version of Excel 2010.
Key Features and Limitations
What are the differences between Excel Starter 2010 and the full version of Excel, and how do these differences affect automotive technicians?
Excel Starter differs from the full version of Excel by including display advertisements and lacking support for advanced features. While the full version of Excel offers extensive functionalities, Excel Starter provides essential tools for basic spreadsheet tasks. Automotive technicians might find the basic features sufficient for simple data entry, tracking inventory, and creating basic reports. However, for more complex tasks like advanced data analysis or creating sophisticated charts, upgrading to the full version of Excel might be necessary.
Upgrading to Excel 2010
How can I upgrade to the full version of Excel 2010 from Excel Starter 2010?
Upgrading to Excel 2010 from Excel Starter 2010 is straightforward. Simply click the Buy tab on the Home tab on the ribbon. This will guide you through the process of purchasing and installing the full version of Excel, unlocking additional features and capabilities.
2. Opening Excel Starter 2010
How can I open Excel Starter 2010 to start managing automotive data?
To open Excel Starter 2010, use the Windows Start button. Here’s how:
-
Click the Start button. If Excel Starter is not listed among the programs you see, click All Programs, then click Microsoft Office Starter.
-
Click Microsoft Excel Starter 2010.
The Excel Starter start screen appears, and a blank spreadsheet is displayed. In Excel Starter, a spreadsheet is called a worksheet, and worksheets are stored in files called workbooks. A workbook can contain one or more worksheets.
 Excel Starter Interface
Understanding the Interface
What are the main components of the Excel Starter interface, and how can they be used effectively in automotive repair tasks?
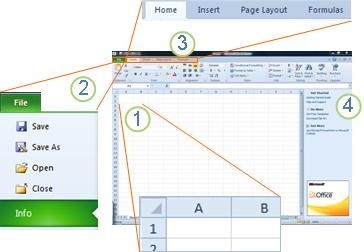
The Excel Starter interface includes several key components:
- Columns and Rows: Columns (labeled with letters) and rows (labeled with numbers) make up the cells of your worksheet.
- File Tab: Clicking the File tab opens the Backstage view of your workbook, where you can open and save files, get information about the current workbook, and perform other tasks unrelated to the workbook’s content, such as printing or sending a copy via email.
- Ribbon Tabs: Each tab in the ribbon displays commands grouped by task. The Home tab is where you’ll spend most of your time entering and formatting data. The Insert tab is used to add tables, charts, pictures, or other graphics to your worksheet. The Page Layout tab allows you to adjust margins and layout, especially for printing. The Formulas tab is used to create calculations on the data in your worksheet.
- Task Pane: The pane along the side of the Excel Starter window includes links to Help and shortcuts to templates and clip art. It provides a starting point for creating workbooks for specific tasks, such as managing a membership list or tracking expenses. The pane also displays advertisements and links to purchase full-featured editions of Office.
3. Creating a New Workbook
How do I create a new workbook in Excel Starter 2010 to manage automotive repair data?
When you create a workbook in Microsoft Excel Starter 2010, you can start from scratch or use a template with pre-designed layouts and formulas. Here’s how:
-
Click File, then click New.
-
To start with a blank grid, click Blank workbook.
-
To start with a specific type of workbook, choose one of the templates available on Office.com. Select from budgets, event planners, membership lists, and more.
-
Excel Starter opens a blank workbook or template, ready for you to add your data.
Using Templates for Automotive Tasks
Are there specific templates available that can help automotive technicians manage their tasks more efficiently?
Yes, there are several templates that can be highly beneficial for automotive technicians:
- Repair Log Template: Track repairs performed on vehicles, including dates, descriptions of issues, parts used, and labor costs.
- Inventory Management Template: Keep track of parts and supplies in the garage, including quantities, order dates, and costs.
- Customer Database Template: Manage customer information, including contact details, vehicle information, and service history.
- Expense Tracker Template: Monitor expenses related to running the auto repair shop, such as utilities, rent, and supplies.
- Maintenance Schedule Template: Create a schedule for routine maintenance tasks for vehicles, helping customers keep their vehicles in optimal condition.
These templates can save time and ensure consistency in data management, helping automotive technicians stay organized and efficient.
4. Saving Your Workbook
Why is it important to save your workbooks regularly, and how can I do it in Excel Starter 2010?
Saving your workbooks regularly is crucial to prevent data loss. To save a workbook in Excel Starter 2010:
- Click the Save button on the Quick Access Toolbar. (Keyboard shortcut: Press CTRL+S.)
- If the workbook has already been saved as a file, any changes you make will be saved directly into the workbook.
- If this is a new workbook that you haven’t saved yet, type a name for the workbook.
- Click Save.
Best Practices for Naming and Organizing Files
What are some best practices for naming and organizing Excel files to ensure efficient data management?
- Descriptive Names: Use clear, descriptive names that reflect the content of the file, such as “RepairLog_VehicleID_Date” or “Inventory_MonthYear.”
- Consistent Naming Conventions: Establish a consistent naming convention for all files to make them easier to find and manage.
- Date-Based Naming: Include dates in the file names to track versions and updates, for example, “CustomerDatabase_20240615.”
- Folder Structure: Create a logical folder structure to organize files by category, such as “CustomerData,” “Inventory,” and “RepairLogs.”
- Backup Regularly: Regularly back up your Excel files to an external drive or cloud storage to prevent data loss in case of hardware failure or other issues.
5. Entering Data
How do I enter data into a worksheet to record automotive repair information?
To work with data in a worksheet, you first need to enter the data into the cells.
-
Click a cell, then type the data into that cell.
-
Press ENTER or TAB to move to the next cell.
Tip: To enter data on a new line within a cell, insert a line break by pressing ALT+ENTER.
-
To enter a series of data, such as days, months, or progressive numbers, type the starting value in a cell, then in the next cell, type a value to establish a pattern.
For example, if you want the series 1, 2, 3, 4, 5…, type 1 and 2 in the first two cells.
Select the cells containing the starting values, then drag the fill handle across the range you want to fill.
Tip: To fill with an ascending sequence, drag down or to the right. To fill with a descending sequence, drag up or to the left.
Tips for Efficient Data Entry
What are some tips and tricks to make data entry faster and more accurate?
- Use AutoFill: Leverage the AutoFill feature to quickly enter sequential data, such as dates, months, or numbers.
- Data Validation: Set up data validation rules to ensure that only valid data is entered into cells, reducing errors.
- Keyboard Shortcuts: Use keyboard shortcuts like CTRL+C (copy), CTRL+V (paste), and CTRL+Z (undo) to speed up data entry and editing.
- Flash Fill: Use Flash Fill to automatically fill in data based on patterns Excel detects in your data.
- Named Ranges: Define named ranges for frequently used cells or ranges to make formulas and data entry easier.
6. Formatting Data
How can I format text and cells to make my worksheets more readable and professional?
You can format text and cells to make your worksheets look the way you want.
-
To wrap text within a cell, select the cell you want to format, then on the Home tab, in the Alignment group, click Wrap Text.
-
To automatically adjust column width and row height to fit the cell contents, select the columns or rows you want to change, then on the Home tab, in the Cells group, click Format.
Under Cell Size, click AutoFit Column Width or AutoFit Row Height.
Tip: To quickly autofit all columns or rows in a worksheet, click the Select All button, then double-click any boundary between two column or row headings.
-
To change the font, select the cells containing the data you want to format, then on the Home tab, in the Font group, click the formats you want.
-
To apply number formatting, click the cells containing the numbers you want to format, then on the Home tab, in the Number group, point to General, and then click the format you want.
For more help with entering and formatting data, see Quick Start: Format numbers in a worksheet.
Formatting Tips for Automotive Data
What specific formatting options are most useful for presenting automotive data clearly?
- Currency Format: Use the currency format for financial data such as repair costs, parts prices, and labor charges.
- Date Format: Apply a consistent date format for repair dates, service dates, and customer birthdays.
- Percentage Format: Use the percentage format for displaying discounts or markups on parts and services.
- Number Format with Decimals: Display numbers with decimals for precise measurements, such as engine specifications or diagnostic readings.
- Conditional Formatting: Use conditional formatting to highlight important data, such as overdue maintenance tasks or low inventory levels.
7. Copying, Moving, or Deleting Data
How can I copy, move, or delete data in Excel Starter 2010 to manage my spreadsheets effectively?
You can use the Cut, Copy, and Paste commands to move or copy rows, columns, and cells. To copy, press CTRL+C to use the Copy command. To move, press CTRL+X to use the Cut command.
-
Select the rows, columns, or cells you want to copy, move, or delete.
To select a row or column, click the row or column heading.
1. Row heading
2. Column heading
To select a cell, click the cell. To select a range of cells, click and drag, or click and use the arrow keys while holding the SHIFT key.
-
Press CTRL+C to copy or CTRL+X to cut.
If you want to delete a row or column, pressing DELETE when the row or column is selected will delete the contents, leaving the row or cell blank. To delete the row or column, right-click the row or column heading, then click Delete Row or Delete Column.
Note: Excel displays an animated moving border around cells that have been cut or copied. To cancel the moving border, press ESC.
-
Place the cursor where you want to copy or move the cells.
To copy or move a row or column, click the header of the row or column that follows where you want to insert the row or column you copied or cut.
To copy or move a cell, click the cell where you want to paste the cell you copied or cut.
To copy or move a range of cells, click the upper-left cell of the paste area.
-
Paste the data in the new location.
For rows or columns, right-click the row or column heading in the new location, then click the Insert command.
For cells or a range of cells, press CTRL+V. The cells you copied or cut replace the cells in the new location.
For more information about copying and pasting cells, see Move or copy cells, rows, and columns.
Efficient Data Management Techniques
What are some efficient data management techniques using copy, move, and delete functions?
- Rearranging Data: Use cut and paste to rearrange data in a logical order for better analysis.
- Duplicating Entries: Use copy and paste to duplicate entries for similar tasks or vehicles, saving time and ensuring consistency.
- Removing Errors: Use delete to remove incorrect or outdated information, keeping your data clean and accurate.
- Inserting Rows and Columns: Insert rows and columns to add new categories or data fields as needed.
- Transposing Data: Use the transpose feature to switch rows and columns, allowing you to view data from different perspectives.
8. Sorting Data
How can I sort data in Excel Starter 2010 to organize automotive information effectively?
When you sort information in a worksheet, you can view the data in the way you want and find values quickly.
Select the Data You Want to Sort
Use the mouse or keyboard commands to select a range of data, such as A1:L5 (multiple rows and columns) or C1:C80 (a single column). The range can include headings that you created to identify columns or rows.
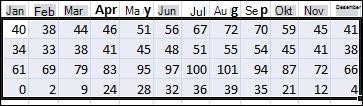 Example of data selected for sorting in Excel
To sort with just two mouse clicks, click Sort & Filter, then click one of the Sort buttons.
- Select a single cell in the column you want to sort by.
- Click the top button to sort ascending (A to Z or smallest number to largest).
- Click the bottom button to sort descending (Z to A or largest number to smallest).
Sorting Applications in Automotive Repair
How can sorting be applied in automotive repair to improve data analysis?
- Sort by Date: Sort repair logs by date to track trends in vehicle issues over time.
- Sort by Vehicle Make/Model: Sort customer data by vehicle make and model to identify common problems.
- Sort by Repair Cost: Sort repair logs by cost to identify the most expensive repairs and manage expenses.
- Sort by Customer Name: Sort customer data alphabetically for easy access and organization.
- Sort by Part Number: Sort inventory data by part number to quickly locate parts and manage stock levels.
9. Filtering Data
How can I filter data in Excel Starter 2010 to find specific information quickly?
By filtering information in a worksheet, you can quickly find values. You can apply filters to one or more columns of data, controlling what you want to see and what you want to exclude.
-
Select the data you want to filter.
Example of data selected for sorting in Excel -
On the Home tab, in the Editing group, click Sort & Filter, then click Filter.
-
Click the arrow in the column header to display a list of filter options.
Note: Depending on the type of data in the column, Excel Starter displays Number Filters or Text Filters in the list.
For more help with filtering, see Quick Start: Filter data by using AutoFilter.
Filtering Applications in Automotive Repair
How can filtering be useful for managing automotive repair data?
- Filter by Date Range: Filter repair logs by date range to analyze repair trends within specific periods.
- Filter by Vehicle Type: Filter customer data by vehicle type to target specific customer groups for marketing campaigns.
- Filter by Repair Type: Filter repair logs by repair type to identify common issues and allocate resources effectively.
- Filter by Status: Filter inventory data by status (e.g., in stock, out of stock, on order) to manage inventory levels.
- Filter by Customer: Filter repair logs by customer to review service history and personalize customer interactions.
10. Calculating Data with Formulas
How can I use formulas to calculate data in Excel Starter 2010 for automotive tasks?
A formula is an equation that can perform calculations, return information, manipulate the contents of other cells, test conditions, and more. Formulas always begin with an equal sign (=).
| Formula | Description |
|---|---|
| *=5+23** | Adds 5 to the product of 2 times 3. |
| =SQRT(A1) | Uses the SQRT function to get the square root value in A1. |
| =TODAY() | Returns the current date. |
| =IF(A1>0) | Tests cell A1 to see if it contains a value greater than 0. |
Select a Cell and Start Typing
In a cell, type the equal sign (=) to begin the formula.
Fill Out the Rest of the Formula
- Type a combination of numbers and operators; for example, 3+7.
- Use the mouse to select other cells (inserting an operator in between). For example, select B1 then type a plus sign (+), select C1 and type +, then select D1.
- Type letters to select from a list of worksheet functions. For example, typing “a” displays all available functions that begin with the letter “a.”
Finish the Formula
To finish a formula that uses a combination of numbers, cell references, and operators, press ENTER.
To finish a formula that uses a function, fill in the information required for the function and then press ENTER. For example, the ABS function requires one numeric value—this can be a number you type, or a cell you select that contains a number.
Formulas for Automotive Calculations
What are some practical formulas for automotive repair calculations?
- Calculating Total Cost:
=SUM(B2:B10)calculates the total cost of parts listed in cells B2 through B10. - Calculating Profit Margin:
=(C2-B2)/C2calculates the profit margin based on cost price (B2) and selling price (C2). - Calculating Labor Hours:
=D2*E2calculates the total labor cost by multiplying labor hours (D2) by hourly rate (E2). - Calculating Sales Tax:
=F2*0.07calculates the sales tax on a repair service with a 7% tax rate. - Calculating Average Repair Time:
=AVERAGE(G2:G10)calculates the average time taken for repairs listed in cells G2 through G10.
11. Creating Charts from Data
How can I create charts in Excel Starter 2010 to visualize automotive data?
A chart is a visual representation of your data. Using elements such as columns (in a column chart) or lines (in a line chart), a chart shows series of numeric data in a graphic format.
 Column Chart
The graphic formatting of a chart makes it easier to understand large amounts of data and the relationships between different series of data. Charts can also show the big picture so that you can analyze your data and look for critical trends.
-
Select the data you want to chart.
Tip: The data should be arranged in rows or columns, with row labels on the left and column labels above the data—Excel automatically determines the best way to plot the data in the chart.
-
On the Insert tab, in the Charts group, click the type of chart you want to use, and then click a chart subtype.
Tip: To see all of the available chart types, click to launch the Insert Chart dialog box, and then click the arrows to scroll through the chart types.
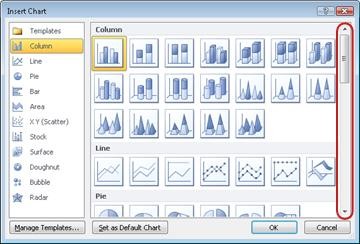 Insert Chart Dialog Box
 -
When you rest the mouse pointer on any one of the chart types, a ScreenTip displays its name.
For more information about any of the chart types, see Available Chart Types.
Chart Examples for Automotive Repair
What types of charts are best suited for visualizing automotive repair data?
- Column Chart: Compare the number of repairs for different vehicle models.
- Line Chart: Track changes in repair costs over time.
- Pie Chart: Show the distribution of repair types (e.g., engine, brakes, transmission).
- Bar Chart: Compare the performance of different technicians based on repair completion time.
- Scatter Plot: Analyze the relationship between vehicle mileage and repair frequency.
12. Printing Worksheets
How do I print worksheets in Excel Starter 2010, and what are the best practices for printing automotive data?
Before you print a worksheet, it’s a good idea to preview it to make sure that it looks the way you want. When you preview a worksheet in Excel, it opens in the Microsoft Office Backstage view. In this view, you can change page setup and layout options before you print.
-
To print a portion of a worksheet, click the worksheet, and then select the range of data you want to print. To print the entire worksheet, click the worksheet to activate it.
-
Click File, then click Print.
Your keyboard shortcut is also pressing CTRL+P.
Note: The preview window displays in black and white, regardless of whether your document includes color, unless you’re using a printer that can print color.
-
Click Print.
Printing Tips for Automotive Technicians
What are some tips for printing automotive repair data effectively?
- Print Preview: Always use print preview to ensure the layout and formatting are correct before printing.
- Fit to Page: Use the “Fit to Page” option to ensure that all data fits on a single page.
- Print Selection: Print only the selected range of cells to avoid printing unnecessary data.
- Headers and Footers: Add headers and footers to include important information such as date, time, and page numbers.
- Gridlines: Choose whether to print gridlines to improve readability.
13. Sharing Workbooks
How can I share workbooks with others in Excel Starter 2010, especially for remote collaboration?
Sometimes you want to share a workbook with other people. If you share a workbook with someone who also has Excel, you can send your workbook as an attachment to an email message. The recipient can open the workbook in Excel to work on it.
Note: Using the command to send an email attachment requires that you have an email program, such as Windows Mail, installed on your computer.
If your goal is for the recipient to see the workbook rather than edit it, you can send a snapshot of the workbook, as either a PDF or XPS file.
-
Click the File tab, then click Save & Send.
-
Click Send Using E-mail.
-
Do one of the following:
- To send the workbook as an Excel file, click Send as Attachment.
- To send the workbook as a snapshot, click Send as PDF or Send as XPS.
-
Your email program starts an email message for you, with the specified file type attached. Write your e-mail, and then send it.
An alternative to sending the workbook is to save it to Windows Live OneDrive. This way, you have a single copy of the workbook that is accessible to other people. You can send people a link to the workbook, where they can view it, and even edit it in their Web browser (if you give them permission).
-
Click the File tab, then click Save & Send.
-
Click Save to Web.
-
Click Sign In, enter your Windows Live ID and password, and then click OK.
If you use Hotmail, Messenger, or Xbox Live, you already have a Windows Live ID. If you don’t have it, click Sign up for a new account to create a new Windows Live ID.
-
Select a folder in OneDrive and click Save As. Type a name for your file and click Save.
The document is now saved on OneDrive. On OneDrive, you can give people permission to view and edit the contents of your folders. When you want to share a workbook, you send a link to it in email.
For more information about saving your documents to OneDrive, see Save documents to OneDrive from Office.
Collaborating on Automotive Data
How can Excel workbooks be shared and used for collaborative automotive repair projects?
- Email Attachments: Share workbooks as email attachments for colleagues to review and edit.
- OneDrive Collaboration: Save workbooks to OneDrive and share links with editing permissions for real-time collaboration.
- PDF or XPS Files: Share snapshots of workbooks as PDF or XPS files for viewing purposes, ensuring data integrity.
- Cloud Storage: Utilize cloud storage solutions to ensure that all team members have access to the latest versions of workbooks.
- Shared Templates: Create and share templates for consistent data management across the team.
14. Getting Additional Help
Where can I find more help and resources for using Excel Starter 2010 in automotive repair?
Office.com is continually updated with new content, including how-to articles, videos, and training courses. If the bottom of the Help Viewer says Offline and you’re connected to the Internet, click Offline, and then click Show content from Office.com.
CAR-REMOTE-REPAIR.EDU.VN also offers specialized training and resources tailored to the automotive repair industry.
Additional Resources for Excel and Automotive Repair
What are some additional resources and training programs that can help automotive technicians improve their Excel skills?
- Microsoft Office Training: Explore official Microsoft Office training courses and tutorials for Excel.
- Online Courses: Enroll in online courses on platforms like Coursera, Udemy, and LinkedIn Learning to learn advanced Excel techniques.
- Industry Forums: Participate in online forums and communities for automotive technicians to share tips and best practices.
- CAR-REMOTE-REPAIR.EDU.VN Training: Take advantage of CAR-REMOTE-REPAIR.EDU.VN’s specialized training programs tailored to automotive repair, focusing on remote diagnostics and data management.
- Technical Documentation: Refer to technical documentation and manuals for specific automotive software and diagnostic tools.
FAQ: Mastering Microsoft Excel 2010 for Automotive Technicians
1. How can Microsoft Excel 2010 improve efficiency in an auto repair shop?
Microsoft Excel 2010 enhances efficiency in auto repair shops by facilitating organized data management, accurate record-keeping, and streamlined reporting. Excel allows technicians to create repair logs, track inventory, manage customer databases, and analyze repair trends, leading to better decision-making and improved service quality.
2. What are the essential Excel functions that every auto technician should know?
Essential Excel functions for auto technicians include SUM for calculating totals, AVERAGE for finding averages, IF for conditional logic, VLOOKUP for searching data, and COUNTIF for counting specific items. Mastering these functions enables technicians to perform essential calculations and data analysis tasks efficiently.
3. Can Excel 2010 be used for remote diagnostics in car repair?
Yes, Excel 2010 is valuable for remote diagnostics in car repair. By using Excel to organize and analyze diagnostic data collected from remote tools, technicians can identify patterns, track vehicle performance, and provide effective remote support and guidance.
4. How do I create a repair log template in Excel 2010?
To create a repair log template, start by opening Excel and setting up columns for key information such as date, vehicle ID, customer name, repair description, parts used, labor hours, and total cost. Use formatting options to make the template readable, and consider adding formulas for automatic calculations of totals and costs.
5. How can I track inventory using Excel 2010?
Tracking inventory in Excel involves creating a spreadsheet with columns for part number, description, quantity in stock, reorder level, and cost. Use formulas to calculate total inventory value and conditional formatting to highlight items that need reordering, ensuring efficient stock management.
6. Is it possible to integrate data from diagnostic tools into Excel 2010?
While direct integration may not always be possible, data from diagnostic tools can be imported into Excel 2010. Export the data from the diagnostic tool in a CSV or text format, then import it into Excel. From there, you can clean, format, and analyze the data to gain insights into vehicle performance and repair needs.
7. What are some best practices for managing customer data in Excel 2010?
Best practices for managing customer data include creating a structured spreadsheet with columns for name, contact information, vehicle details, service history, and notes. Ensure data accuracy by using data validation rules, and protect sensitive information by password-protecting the Excel file.
8. How can I use Excel 2010 to analyze repair trends?
To analyze repair trends, gather