Partitioning a hard drive in Windows 10 without extra software is indeed possible, offering technicians flexibility. At CAR-REMOTE-REPAIR.EDU.VN, we’re dedicated to providing the insights you need to master remote auto repair and diagnostics. Let’s dive into the simple steps to reallocate disk space, ensuring optimal performance and organization, using built-in tools. With the disk management feature, creating separate storage sections is very manageable.
Contents
- 1. Understanding Disk Partitioning in Windows 10
- 2. Accessing Disk Management in Windows 10
- 3. Creating a New Partition in Windows 10
- 3.1. Shrinking an Existing Partition
- 3.2. Creating the New Partition
- 4. Extending an Existing Partition in Windows 10
- 5. Deleting a Partition in Windows 10
- 6. Troubleshooting Common Issues
- 7. Best Practices for Disk Partitioning
- 8. Benefits of CAR-REMOTE-REPAIR.EDU.VN Training Programs
- 9. Real-World Applications of Disk Partitioning
- 10. Advanced Partitioning Techniques
- 11. Using Command Prompt for Disk Partitioning
- 12. Cloud-Based Partitioning and Storage Solutions
- 13. Disk Partitioning for Automotive Software
- 14. The Role of SSDs in Modern Automotive Diagnostics
- 15. Tips for Optimizing Disk Partitioning for Performance
- 16. Future Trends in Disk Partitioning and Storage
- 17. Legal and Ethical Considerations for Disk Partitioning
- 18. Partitioning and Data Recovery
- 19. The Importance of Disk Partitioning in Automotive Cybersecurity
- 20. How to Choose the Right Partitioning Strategy
- 21. Understanding Partition Alignment
- 22. How Disk Partitioning Affects System Backups
- 23. Addressing Common Partitioning Myths
- 24. Partitioning for Dual-Booting: A Step-by-Step Guide
- 25. How to Optimize Partition Sizes for Different Uses
- 26. The Importance of Using the Correct File System
- 27. Understanding Different Partition Types
- 28. How to Mount a Partition in Windows 10
- 29. Disk Partitioning and Virtualization
- 30. Ensuring Data Security with Partition Encryption
- 31. The Importance of a Proper Shutdown Sequence
- 32. Monitoring Disk Health
- 33. What about Using Third-Party Tools?
- 34. Understanding GUID Partition Table (GPT) and Master Boot Record (MBR)
- 35. Disk Quotas
- 36. Optimizing Storage Spaces
- 37. Live Partitioning: Myth or Reality?
- 38. Dynamic Disks vs. Basic Disks
- 39. Troubleshooting “Invalid Partition Table” Errors
- 40. Understanding Volume Shadow Copy Service (VSS)
- 41. Partitioning a Drive with Bootable Media
- 42. GPT Protective Partition: What is It?
- 43. Maintaining Partition Integrity
- 44. Accessing Hidden Partitions
- 45. The Relationship Between Partitions and Mount Points
- 46. Partitioning for Security: Best Practices
- 47. Restoring a System Image to a Specific Partition
- 48. Automating Partitioning with Scripts
- 49. The Future of Partitioning in the Cloud Era
- 50. Continued Learning and Certification
1. Understanding Disk Partitioning in Windows 10
Disk partitioning refers to dividing a physical hard drive into multiple logical drives, each functioning as a separate storage unit. This can be incredibly useful for:
- Organizing Files: Keep your operating system, applications, and personal files separate.
- Dual-Booting: Install multiple operating systems on the same drive.
- Data Backup: Dedicate a partition for system backups or critical data.
- Improving Performance: In some cases, partitioning can help optimize disk access times.
2. Accessing Disk Management in Windows 10
The Disk Management tool is your go-to utility for partitioning without external software. Here’s how to access it:
- Search: Type “Computer Management” in the Windows search bar.
- Run as Administrator: Right-click “Computer Management” and select “Run as administrator”.
- Navigate: In the Computer Management window, find and click on “Disk Management” under “Storage”.
This will display all the drives connected to your system, along with their partitions and free space.
3. Creating a New Partition in Windows 10
To create a new partition, you’ll need unallocated space on your hard drive. If you don’t have any, you can shrink an existing partition to create some.
3.1. Shrinking an Existing Partition
- Right-Click: In Disk Management, right-click the partition you want to shrink (usually the C: drive).
- Select Shrink Volume: Choose “Shrink Volume” from the context menu.
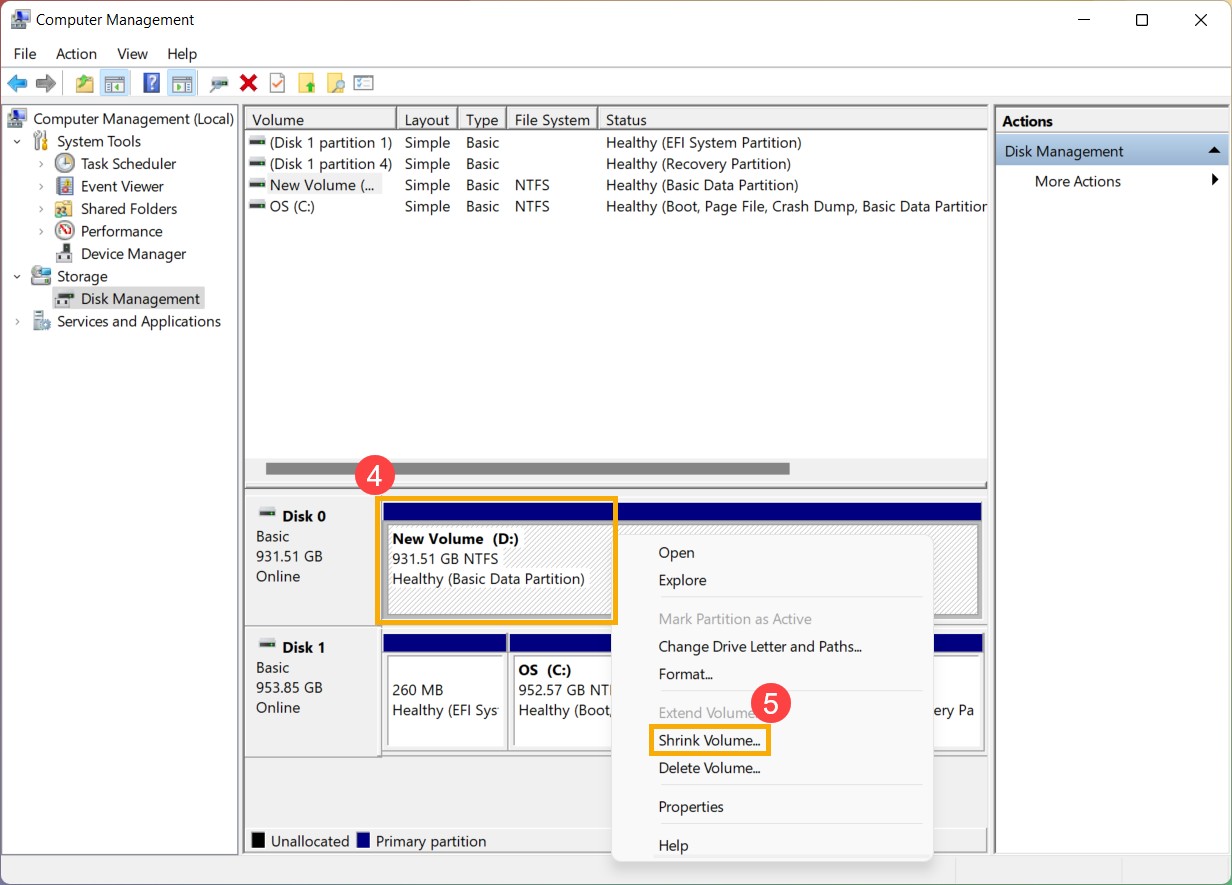 Shrinking a partition to create unallocated space for a new drive in Windows 10 Disk Management
- Enter Shrink Amount: Windows will query the volume for available shrink space. Enter the amount of space you want to shrink in MB (megabytes). Note that you may not be able to shrink the volume by the full amount suggested due to unmovable system files.
- Click Shrink: Click the “Shrink” button to proceed.
After the shrinking process, you’ll see unallocated space on your drive.
3.2. Creating the New Partition
- Right-Click: Right-click on the unallocated space.
- Select New Simple Volume: Choose “New Simple Volume” from the context menu.
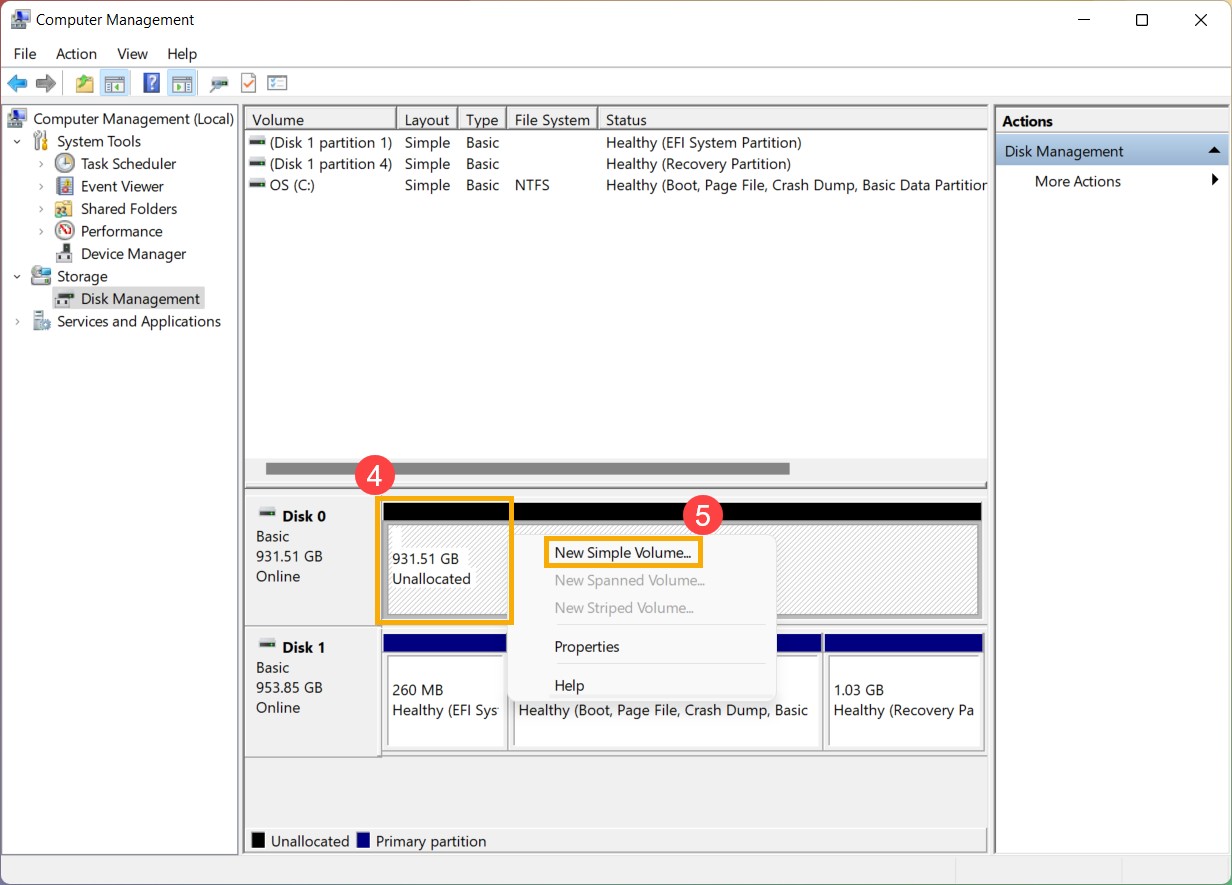 Creating a new simple volume on an unallocated hard disk partition in Windows 10 Disk Management
- New Simple Volume Wizard: The New Simple Volume Wizard will appear. Click “Next” to continue.
- Specify Volume Size: Enter the size for the new partition in MB. If you want to use all the unallocated space, accept the default value.
- Assign Drive Letter: Assign a drive letter to the new partition (e.g., D:, E:, etc.).
- Format Partition: Choose a file system (NTFS is recommended for Windows) and provide a volume label (the name that will appear in File Explorer). You can also choose to perform a quick format, which is faster but less thorough.
- Finish: Review your settings and click “Finish” to create the new partition.
Your new partition will now appear in File Explorer and is ready for use.
4. Extending an Existing Partition in Windows 10
If you need to increase the size of an existing partition, you can extend it using unallocated space that is directly adjacent to it on the drive.
- Right-Click: In Disk Management, right-click the partition you want to extend.
- Select Extend Volume: Choose “Extend Volume” from the context menu. Note that this option is only available if there is unallocated space directly to the right of the partition you’re trying to expand.
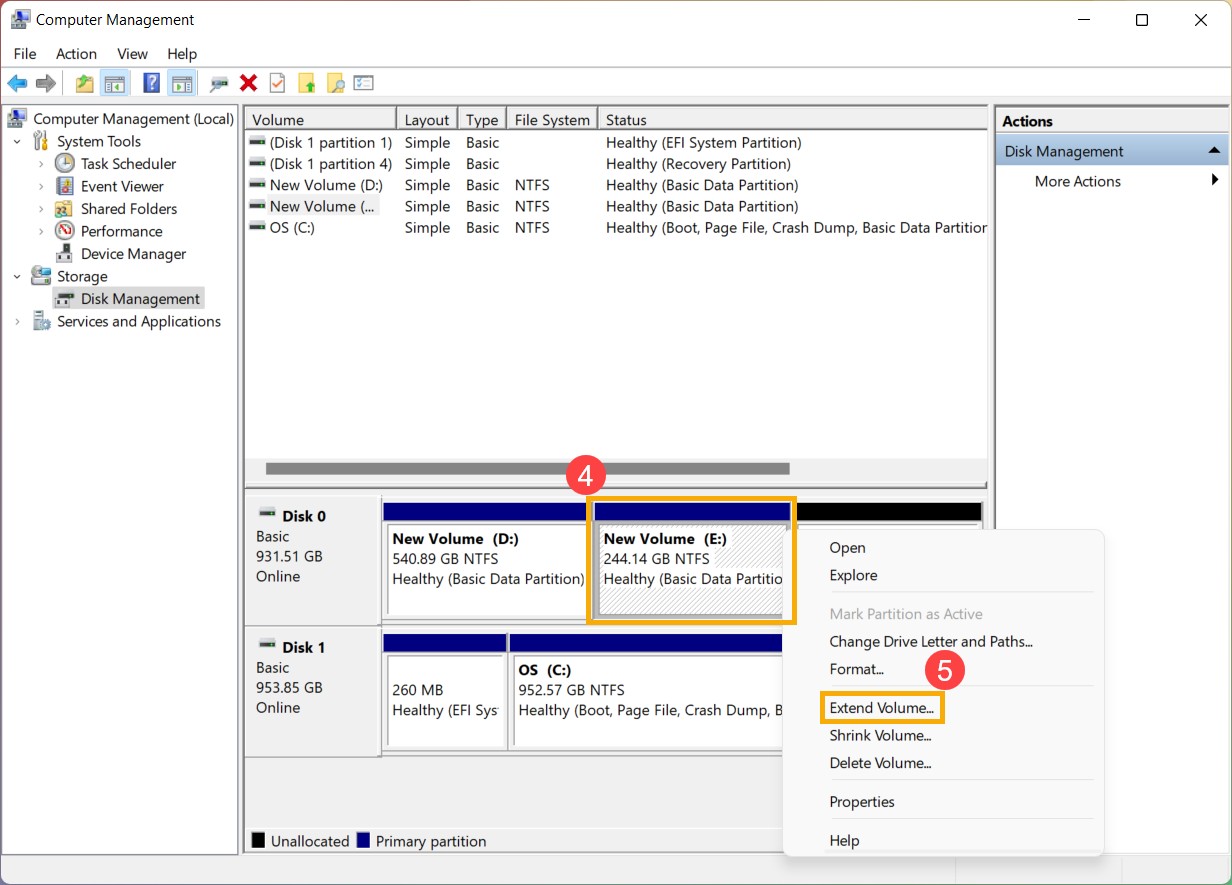 Extending the available partition volume on a Windows 10 hard disk using Disk Management
- Extend Volume Wizard: The Extend Volume Wizard will appear. Click “Next” to continue.
- Select Disks: Specify the amount of space you want to add to the partition. If there is only one unallocated space available, it will be selected by default.
- Finish: Review your settings and click “Finish” to extend the partition.
The selected partition will now include the unallocated space, increasing its overall size.
5. Deleting a Partition in Windows 10
If you no longer need a partition, you can delete it. Keep in mind that deleting a partition will erase all data on it, so back up any important files first.
- Right-Click: In Disk Management, right-click the partition you want to delete.
- Select Delete Volume: Choose “Delete Volume” from the context menu.
- Confirm: A warning message will appear. Click “Yes” to confirm the deletion.
The space formerly occupied by the partition will become unallocated, and you can then use it to create a new partition or extend an existing one.
6. Troubleshooting Common Issues
While partitioning in Windows 10 is generally straightforward, you might encounter some issues:
- Not Enough Unallocated Space: If you don’t have enough unallocated space, you’ll need to shrink an existing partition or delete one.
- Extend Volume Grayed Out: The “Extend Volume” option is only available if there is unallocated space directly to the right of the partition you want to extend.
- Cannot Shrink Volume: Sometimes, Windows cannot shrink a volume due to immovable system files. You can try defragmenting the drive or disabling system restore to free up space.
- Dynamic Disks: If your disk is configured as a dynamic disk, the steps for partitioning may be different. Dynamic disks offer more advanced features like spanned and striped volumes, but they are not compatible with all operating systems.
7. Best Practices for Disk Partitioning
- Backup Data: Always back up your data before making any changes to your disk partitions.
- Plan Ahead: Think about how you want to organize your files and data before creating partitions.
- Use NTFS: For Windows systems, NTFS is the recommended file system for partitions.
- Consider SSDs: If you’re using a solid-state drive (SSD), partitioning may not be as necessary, as SSDs offer faster access times and better performance overall.
8. Benefits of CAR-REMOTE-REPAIR.EDU.VN Training Programs
At CAR-REMOTE-REPAIR.EDU.VN, we understand the challenges faced by auto technicians in today’s rapidly evolving industry. Our training programs are designed to equip you with the knowledge and skills you need to excel in remote auto repair and diagnostics. Here are some of the benefits of our programs:
- Expert Instructors: Learn from experienced professionals with in-depth knowledge of remote auto repair techniques.
- Hands-On Training: Get practical experience using the latest diagnostic tools and software.
- Comprehensive Curriculum: Cover a wide range of topics, from basic diagnostics to advanced troubleshooting.
- Flexible Learning Options: Choose from online courses, in-person workshops, and customized training programs.
- Industry Certification: Earn certifications that demonstrate your expertise and enhance your career prospects.
9. Real-World Applications of Disk Partitioning
Disk partitioning isn’t just a theoretical concept; it has numerous real-world applications in the automotive repair industry:
- Diagnostic Tools: Create a separate partition for installing and running diagnostic software, ensuring it doesn’t interfere with other applications.
- Data Logging: Dedicate a partition for storing data logs from vehicle diagnostics, making it easier to analyze and manage the information.
- Operating Systems: Install a lightweight operating system on a separate partition for running specific diagnostic tools or applications.
- Virtual Machines: Use partitioning to create a dedicated space for virtual machines, allowing you to test software and configurations in a safe and isolated environment.
10. Advanced Partitioning Techniques
For more advanced users, there are several additional partitioning techniques to consider:
- GPT vs. MBR: GPT (GUID Partition Table) is a modern partitioning scheme that supports larger disks and more partitions than MBR (Master Boot Record). GPT is recommended for newer systems, while MBR is still used for older systems and compatibility reasons.
- RAID: RAID (Redundant Array of Independent Disks) is a technology that combines multiple physical drives into a single logical unit for improved performance, redundancy, or both. RAID can be implemented using hardware or software, and it requires careful planning and configuration.
- LVM: LVM (Logical Volume Management) is a more flexible approach to disk partitioning that allows you to create logical volumes that span multiple physical disks. LVM provides features like snapshots, resizing, and thin provisioning, making it ideal for complex storage environments.
11. Using Command Prompt for Disk Partitioning
While Disk Management provides a graphical interface for partitioning, you can also use the Command Prompt for more advanced control. Here’s how:
- Open Command Prompt: Type “cmd” in the Windows search bar, right-click “Command Prompt”, and select “Run as administrator”.
- Diskpart: Type
diskpartand press Enter to start the Diskpart utility. - List Disks: Type
list diskand press Enter to see a list of available disks. - Select Disk: Type
select disk <disk number>and press Enter to select the disk you want to partition (e.g.,select disk 0). - List Partitions: Type
list partitionand press Enter to see a list of partitions on the selected disk. - Create Partition: Type
create partition primary size=<size in MB>and press Enter to create a new primary partition with the specified size. - Format Partition: Type
format fs=ntfs quick label=<volume label>and press Enter to format the partition with the NTFS file system and assign a volume label. - Assign Letter: Type
assign letter=<drive letter>and press Enter to assign a drive letter to the partition.
The Command Prompt provides more flexibility and control over partitioning, but it also requires more technical knowledge and carries a higher risk of errors.
12. Cloud-Based Partitioning and Storage Solutions
In addition to traditional disk partitioning, there are also cloud-based storage solutions that offer similar benefits:
- Cloud Storage: Services like Google Drive, Dropbox, and OneDrive allow you to store your files in the cloud, freeing up space on your local hard drive.
- Virtual Machines: Cloud-based virtual machines provide a complete computing environment in the cloud, allowing you to run applications and store data without the need for local partitions.
- NAS Devices: Network-attached storage (NAS) devices provide centralized storage for multiple devices on your network, allowing you to share files and data across your organization.
These cloud-based solutions offer scalability, redundancy, and accessibility, making them ideal for businesses and individuals with large storage needs.
13. Disk Partitioning for Automotive Software
In the automotive industry, disk partitioning can be particularly useful for managing software and data related to vehicle diagnostics and repair. Here are some specific use cases:
- Diagnostic Software: Create a separate partition for installing diagnostic software, such as scan tools, code readers, and oscilloscopes.
- Vehicle Data: Dedicate a partition for storing vehicle-specific data, such as VIN numbers, diagnostic codes, and repair histories.
- Firmware Updates: Use partitioning to create a dedicated space for storing firmware updates for vehicle ECUs (electronic control units).
- Training Materials: Store training materials, manuals, and videos on a separate partition, making them easily accessible to technicians.
By organizing your software and data in this way, you can improve efficiency, reduce errors, and ensure that you have the information you need to perform accurate and effective vehicle repairs.
14. The Role of SSDs in Modern Automotive Diagnostics
Solid-state drives (SSDs) have become increasingly popular in the automotive industry due to their speed, reliability, and durability. While partitioning is still possible with SSDs, it may not be as necessary as with traditional hard drives.
SSDs offer much faster access times than hard drives, which can significantly improve the performance of diagnostic software and other applications. They are also more resistant to shock and vibration, making them ideal for use in mobile diagnostic tools.
However, partitioning can still be useful for organizing data and managing storage space on SSDs. For example, you might create a separate partition for diagnostic software, vehicle data, and firmware updates.
15. Tips for Optimizing Disk Partitioning for Performance
To get the most out of your disk partitions, here are some tips for optimizing performance:
- Defragment Regularly: Defragmenting your hard drive can help improve access times and reduce fragmentation, which can slow down your system.
- Use Disk Cleanup: The Disk Cleanup tool can help you remove unnecessary files and free up space on your partitions.
- Monitor Disk Space: Keep an eye on your disk space usage and make sure you have enough free space on each partition.
- Optimize Page File: The page file is a hidden file on your hard drive that Windows uses as virtual memory. Optimizing the page file can improve system performance, especially if you have limited RAM.
- Disable Indexing: Indexing is a feature that allows Windows to quickly search for files on your hard drive. However, it can also slow down your system. Disabling indexing on partitions that contain static data can improve performance.
By following these tips, you can ensure that your disk partitions are performing at their best.
16. Future Trends in Disk Partitioning and Storage
The field of disk partitioning and storage is constantly evolving, with new technologies and techniques emerging all the time. Here are some future trends to watch out for:
- NVMe: Non-volatile memory express (NVMe) is a high-performance interface for SSDs that offers even faster access times than traditional SATA interfaces.
- 3D NAND: 3D NAND is a type of flash memory that stacks memory cells vertically, allowing for higher storage densities and improved performance.
- Storage Class Memory: Storage class memory (SCM) is a new type of memory that combines the speed of RAM with the persistence of flash memory. SCM promises to revolutionize storage and memory architectures.
- Software-Defined Storage: Software-defined storage (SDS) is a virtualized approach to storage that allows you to manage storage resources independently of the underlying hardware. SDS offers flexibility, scalability, and cost savings.
- Cloud-Native Storage: Cloud-native storage is a type of storage that is designed specifically for cloud environments. Cloud-native storage offers features like automatic scaling, replication, and disaster recovery.
These future trends promise to bring even faster, more efficient, and more reliable storage solutions to the automotive industry and beyond.
17. Legal and Ethical Considerations for Disk Partitioning
When partitioning hard drives, it’s crucial to consider legal and ethical implications. This includes:
- Data Privacy: Ensuring compliance with data privacy laws and regulations, especially when dealing with customer or vehicle data.
- Software Licensing: Adhering to software licensing agreements and avoiding the use of unauthorized or pirated software.
- Intellectual Property: Respecting intellectual property rights and avoiding the unauthorized copying or distribution of copyrighted materials.
- Security: Implementing security measures to protect against data breaches, malware, and other threats.
- Environmental Responsibility: Disposing of old hard drives and storage devices in an environmentally responsible manner.
By following these legal and ethical guidelines, you can ensure that you are using disk partitioning in a responsible and sustainable way.
18. Partitioning and Data Recovery
Data loss can be a significant concern when partitioning hard drives. Here are some tips for preventing data loss and recovering data in case of an accident:
- Backup Regularly: Back up your data regularly to an external hard drive, cloud storage, or other backup media.
- Use Data Recovery Software: Data recovery software can help you recover files that have been accidentally deleted or lost due to partitioning errors.
- Avoid Overwriting Data: If you accidentally delete a partition, avoid overwriting the data by immediately shutting down your system and seeking professional help.
- Seek Professional Help: If you are unable to recover your data on your own, seek professional help from a data recovery specialist.
With these precautions, you can minimize the risk of data loss and ensure that you can recover your data in case of an emergency.
19. The Importance of Disk Partitioning in Automotive Cybersecurity
In the automotive industry, cybersecurity is becoming increasingly important. Disk partitioning can play a role in protecting vehicle systems and data from cyber threats. Here are some examples:
- Separating Critical Systems: Create separate partitions for critical systems, such as engine control, braking, and steering, to prevent unauthorized access and tampering.
- Isolating Diagnostic Tools: Isolate diagnostic tools on a separate partition to prevent them from being compromised by malware or other threats.
- Securing Vehicle Data: Secure vehicle data on a separate partition with encryption and access controls to protect against data breaches.
- Implementing Intrusion Detection: Implement intrusion detection systems on each partition to monitor for suspicious activity and alert administrators of potential threats.
By implementing these cybersecurity measures, you can help protect vehicles and their occupants from cyber attacks.
20. How to Choose the Right Partitioning Strategy
Choosing the right partitioning strategy depends on your specific needs and goals. Here are some factors to consider:
- Operating System: The operating system you are using will determine the file systems and partitioning schemes that are supported.
- Storage Capacity: The storage capacity of your hard drive will determine the number and size of partitions you can create.
- Performance: The performance of your hard drive and the applications you are using will influence the partitioning strategy that is best for you.
- Security: The security requirements of your data and systems will determine the security measures you need to implement.
- Flexibility: The flexibility of your partitioning strategy will determine how easily you can adapt to changing needs and requirements.
By considering these factors, you can choose a partitioning strategy that meets your specific needs and goals.
21. Understanding Partition Alignment
Partition alignment is crucial for optimizing performance, especially on SSDs. Here’s why:
- Improved Performance: Correct alignment ensures that read and write operations align with the physical blocks on the storage device, reducing overhead and improving speed.
- Extended Lifespan: Proper alignment can reduce wear and tear on SSDs, extending their lifespan.
- Data Integrity: Misaligned partitions can lead to data corruption and other issues.
To ensure proper alignment, use the Disk Management tool or other partitioning software that automatically aligns partitions to the correct boundaries.
22. How Disk Partitioning Affects System Backups
Disk partitioning can significantly impact your system backup strategy. Here’s how:
- Targeted Backups: Partitioning allows you to back up only the partitions that contain important data, reducing backup time and storage space.
- Separate System and Data: Keeping your operating system and data on separate partitions makes it easier to restore your system without affecting your personal files.
- Image-Based Backups: Image-based backups capture the entire contents of a partition, including the operating system, applications, and data. This allows you to quickly restore your system to a previous state in case of a failure.
When creating your backup strategy, consider how disk partitioning can help you protect your data and minimize downtime.
23. Addressing Common Partitioning Myths
There are several myths surrounding disk partitioning. Let’s debunk some of them:
- Myth: Partitioning Improves Performance on All Drives: While partitioning can improve performance on traditional hard drives, it may not have the same effect on SSDs.
- Myth: More Partitions are Always Better: Creating too many partitions can complicate your storage management and reduce overall performance.
- Myth: Partitioning is Only for Dual-Booting: Partitioning has many other uses, including organizing files, backing up data, and securing systems.
By understanding the facts about disk partitioning, you can make informed decisions about your storage strategy.
24. Partitioning for Dual-Booting: A Step-by-Step Guide
Dual-booting allows you to install multiple operating systems on the same computer. Here’s how to set it up using disk partitioning:
- Create Partitions: Create separate partitions for each operating system you want to install.
- Install First OS: Install the first operating system on its designated partition.
- Install Second OS: Install the second operating system on its designated partition. The installer should automatically detect the existing operating system and configure the boot menu.
- Configure Boot Menu: If necessary, configure the boot menu to choose which operating system to start when you turn on your computer.
Dual-booting can be useful for testing new operating systems, running legacy applications, or simply having access to different environments.
25. How to Optimize Partition Sizes for Different Uses
Choosing the right partition sizes is crucial for optimizing your storage strategy. Here are some guidelines:
- Operating System: Allocate at least 100 GB for the operating system partition to ensure enough space for system files, applications, and updates.
- Applications: Allocate enough space for the applications you plan to install, plus some extra space for future growth.
- Data: Allocate the remaining space for your data partition, taking into account the types and sizes of files you plan to store.
- Backup: If you plan to create a separate backup partition, allocate enough space to store your backups.
By carefully planning your partition sizes, you can ensure that you have enough space for all your needs.
26. The Importance of Using the Correct File System
Choosing the correct file system is essential for ensuring compatibility, performance, and security. Here are some common file systems:
- NTFS: NTFS (New Technology File System) is the recommended file system for Windows. It supports large file sizes, security features, and advanced disk management.
- FAT32: FAT32 (File Allocation Table 32) is an older file system that is compatible with a wide range of operating systems. However, it has limitations on file size and security.
- exFAT: exFAT (Extended File Allocation Table) is a modern file system that is designed for flash drives and other removable storage devices. It supports large file sizes and is compatible with both Windows and macOS.
When formatting a partition, choose the file system that is best suited for your needs and the operating system you are using.
27. Understanding Different Partition Types
There are several different types of partitions, each with its own characteristics and uses:
- Primary Partition: Primary partitions are the most common type of partition. They can be used to store operating systems, applications, and data.
- Extended Partition: Extended partitions are used to create multiple logical drives on a single physical drive. They can contain multiple logical partitions.
- Logical Partition: Logical partitions are partitions created within an extended partition. They can be used to store applications and data.
- System Partition: The system partition contains the files necessary to start the operating system. It is usually a primary partition.
- Boot Partition: The boot partition contains the boot loader, which is responsible for loading the operating system. It may be the same as the system partition or a separate partition.
Understanding the different types of partitions can help you plan your storage strategy and create the partitions that are best suited for your needs.
28. How to Mount a Partition in Windows 10
Mounting a partition allows you to access it from a specific folder in your file system. Here’s how to do it:
- Open Disk Management: Open the Disk Management tool.
- Right-Click Partition: Right-click the partition you want to mount.
- Change Drive Letter and Paths: Select “Change Drive Letter and Paths”.
- Add Mount Point: Click “Add” and choose a folder to mount the partition to.
- OK: Click “OK” to save the changes.
Mounting a partition can be useful for organizing your files and creating custom file system layouts.
29. Disk Partitioning and Virtualization
Disk partitioning can be particularly useful in virtualization environments. Here’s how:
- Separate VMs: Create separate partitions for each virtual machine to isolate them from each other and improve security.
- Shared Storage: Use a shared partition to store data that is accessed by multiple virtual machines.
- Snapshot Partitions: Create snapshot partitions to quickly revert virtual machines to a previous state.
By using disk partitioning in virtualization environments, you can improve performance, security, and manageability.
30. Ensuring Data Security with Partition Encryption
Encrypting partitions is an effective way to protect your data from unauthorized access. Here’s how to do it:
- BitLocker: Windows BitLocker is a built-in encryption tool that can encrypt entire partitions.
- Third-Party Software: There are also third-party encryption tools that can encrypt partitions.
- Password Protection: Use strong passwords to protect your encryption keys.
By encrypting your partitions, you can ensure that your data remains safe even if your computer is lost or stolen.
31. The Importance of a Proper Shutdown Sequence
Always properly shut down your computer before making any changes to your disk partitions. This will help prevent data loss and other issues. Here’s how to do it:
- Close All Applications: Close all open applications.
- Save Your Work: Save any unsaved work.
- Shut Down Windows: Click the Start button and select “Shut down”.
- Wait for Shutdown: Wait for Windows to completely shut down before turning off your computer.
By following a proper shutdown sequence, you can ensure that your data is safe and your system is stable.
32. Monitoring Disk Health
Regularly monitoring the health of your hard drives is important for preventing data loss and ensuring optimal performance. Here are some tools you can use:
- S.M.A.R.T. : S.M.A.R.T. (Self-Monitoring, Analysis and Reporting Technology) is a built-in feature in most hard drives that monitors various aspects of drive health.
- Disk Management: The Disk Management tool can display basic information about drive health.
- Third-Party Tools: There are also third-party tools that provide more detailed information about drive health.
By monitoring disk health, you can identify potential problems early and take steps to prevent data loss.
33. What about Using Third-Party Tools?
While Windows 10’s Disk Management is powerful, third-party tools offer advanced features such as:
- More Flexible Resizing: Handle unmovable files easier than Disk Management.
- Partition Recovery: Recover lost or deleted partitions.
- Advanced Formatting: More file system options and alignment tools.
However, use third-party tools cautiously and always back up your data first.
34. Understanding GUID Partition Table (GPT) and Master Boot Record (MBR)
GPT and MBR are two different partitioning schemes. GPT is more modern, supports larger disks, and is generally preferred for newer systems. MBR is older and has limitations but is still used for compatibility. To determine which scheme you’re using:
- Open Disk Management.
- Right-click on the disk (not a partition) and select Properties.
- Go to the Volumes tab. The Partition style will be listed.
35. Disk Quotas
Disk quotas allow you to limit the amount of disk space that users can use on a partition. This is useful for managing storage and preventing users from filling up the entire drive. To set up disk quotas:
- Right-click the partition in File Explorer and select Properties.
- Go to the Quota tab.
- Enable quota management and configure the settings.
36. Optimizing Storage Spaces
Storage Spaces allows you to group multiple physical drives into a storage pool and create virtual disks from that pool. This provides flexibility and resilience. To set up Storage Spaces:
- Search for “Storage Spaces” in the Start menu and open it.
- Click “Create a new pool and storage space”.
- Follow the prompts to select the drives and configure the storage space.
37. Live Partitioning: Myth or Reality?
Live partitioning, or resizing partitions while the system is running, is possible with some third-party tools. However, it carries a higher risk of data loss and is generally not recommended unless you have a reliable backup and are comfortable with the process.
38. Dynamic Disks vs. Basic Disks
Dynamic disks offer more advanced features like spanned and striped volumes, but they are not compatible with all operating systems. Basic disks are simpler and more compatible. You can convert a basic disk to a dynamic disk in Disk Management by right-clicking the disk and selecting “Convert to Dynamic Disk.”
39. Troubleshooting “Invalid Partition Table” Errors
An “Invalid Partition Table” error usually indicates a problem with the disk’s partitioning information. This can be caused by corrupted data, a failed drive, or incorrect BIOS settings. To troubleshoot this error:
- Check BIOS Settings: Ensure that the BIOS is correctly detecting the hard drive.
- Run CHKDSK: Run the CHKDSK utility to check for and repair file system errors.
- Use a Partition Recovery Tool: Use a partition recovery tool to attempt to repair the partition table.
40. Understanding Volume Shadow Copy Service (VSS)
Volume Shadow Copy Service (VSS) is a Windows feature that allows you to create snapshots of volumes, even while they are in use. This is used for backups and system restore points. VSS can sometimes interfere with partitioning operations, so it may be necessary to disable it temporarily.
41. Partitioning a Drive with Bootable Media
If you can’t access Windows, you can partition a drive using bootable media, such as a Windows installation disc or a Linux live CD. These tools provide access to partitioning utilities without requiring a working operating system.
42. GPT Protective Partition: What is It?
A GPT protective partition is a special partition that is created on MBR disks when they are used in systems that support GPT. This partition is designed to prevent older operating systems from attempting to access the disk and potentially corrupting the data.
43. Maintaining Partition Integrity
To maintain the integrity of your disk partitions:
- Regularly Run CHKDSK: Check for and repair file system errors.
- Defragment the Drive: Defragment the drive to improve performance.
- Monitor Disk Health: Monitor the health of the hard drive to detect potential problems early.
- Back Up Your Data: Back up your data regularly to protect against data loss.
44. Accessing Hidden Partitions
Some partitions, such as recovery partitions, are hidden by default. To access these partitions, you can use Disk Management or the Command Prompt. In Disk Management, right-click the partition and select “Change Drive Letter and Paths” to assign a drive letter.
45. The Relationship Between Partitions and Mount Points
Partitions are physical divisions of a hard drive, while mount points are folders in the file system that are used to access those partitions. You can mount a partition to any folder in the file system, allowing you to create custom storage layouts.
46. Partitioning for Security: Best Practices
To improve security with partitioning:
- Separate System and Data: Keep your operating system and data on separate partitions to prevent unauthorized access.
- Encrypt Partitions: Encrypt partitions to protect against data breaches.
- Use Disk Quotas: Use disk quotas to limit the amount of disk space that users can use.
- Implement Access Controls: Implement access controls to restrict access to sensitive data.
47. Restoring a System Image to a Specific Partition
To restore a system image to a specific partition:
- Boot from Recovery Media: Boot your computer from the recovery media.
- Select Restore Option: Select the option to restore a system image.
- Choose Image and Partition: Choose the system image you want to restore and the partition you want to restore it to.
- Follow Prompts: Follow the prompts to complete the restore process.
48. Automating Partitioning with Scripts
You can automate partitioning with scripts using the Diskpart utility in the Command Prompt. This is useful for deploying systems with consistent partition layouts.
49. The Future of Partitioning in the Cloud Era
In the cloud era, partitioning is becoming less important as more data and applications are stored in the cloud. However, partitioning is still useful for managing local storage, especially for virtual machines and other cloud-based systems.
50. Continued Learning and Certification
To stay ahead in the rapidly evolving field of remote auto repair and diagnostics, continuous learning is essential. CAR-REMOTE-REPAIR.EDU.VN offers a range of training programs and certifications to help you enhance your skills and advance your career. Contact us today to learn more about our programs and how they can benefit you.
Whether you’re dealing with complex diagnostics or routine maintenance, mastering the art of disk partitioning in Windows 10 can significantly enhance your efficiency and organizational skills. Remember to follow best practices and take advantage of the resources available at CAR-REMOTE-REPAIR.EDU.VN to stay ahead in this ever-evolving industry.
CAR-REMOTE-REPAIR.EDU.VN is committed to offering top-notch education and support for auto technicians. We also provide remote diagnostic tools and software training, equipping professionals to excel in the modern automotive landscape. For more information, visit our website or contact us at Address: 1700 W Irving Park Rd, Chicago, IL 60613, United States. Whatsapp: +1 (641) 206-8880. Website: CAR-REMOTE-REPAIR.EDU.VN. Master partition management and enhance system efficiency.