Want to learn how to install Windows using a flash drive without extra software? CAR-REMOTE-REPAIR.EDU.VN provides a comprehensive guide to simplify the process. Explore dual boot methods and safe installation techniques for your automotive repair needs, enhancing your understanding of operating system deployment. Get ready to master flash drive Windows installation and boost your tech skills!
Contents
- 1. What Is A Flash Drive Windows Installation And Why Is It Useful?
- 1.1. What Are The Benefits Of Using A Flash Drive For Windows Installation?
- 1.2. What Are The Drawbacks Of Using A Flash Drive For Windows Installation?
- 2. What Do You Need To Install Windows With A Flash Drive Without Software?
- 2.1. How To Download A Windows ISO File?
- 2.2. How To Prepare A USB Flash Drive For Windows Installation?
- 2.3. What Are The Minimum System Requirements For Installing Windows?
- 3. Step-By-Step Guide: How To Install Windows With A Flash Drive Without Software?
- 3.1. How To Boot From The USB Flash Drive?
- 3.2. How To Start The Windows Installation Process?
- 3.3. How To Configure BIOS Settings For USB Boot?
- 4. What Are The Best Practices For A Smooth Installation?
- 4.1. How To Avoid Common Installation Errors?
- 4.2. How To Troubleshoot Common Problems During Installation?
- 5. What Are The Alternatives To Installing Windows With A Flash Drive?
- 5.1. How To Install Windows Using A DVD?
- 5.2. How To Perform A Network Installation Of Windows?
- 6. How Can CAR-REMOTE-REPAIR.EDU.VN Help Automotive Technicians With Their Tech Skills?
- 6.1. What Remote Diagnostic Training Does CAR-REMOTE-REPAIR.EDU.VN Offer?
- 6.2. How Does CAR-REMOTE-REPAIR.EDU.VN Support Remote Automotive Repairs In The USA?
- 7. Case Studies: Successful Windows Installations In Automotive Repair Shops
- 7.1. Case Study 1: Speeding Up Diagnostic Software Installation
- 7.2. Case Study 2: Recovering A Corrupted System In A Mobile Repair Unit
- 7.3. Case Study 3: Upgrading An Older System To Windows 10
- 8. What Are The Future Trends In Windows Installation For Automotive Repair?
- 8.1. How Will Cloud-Based Installation Impact Automotive Techs?
- 8.2. What Role Will Automated Deployment Tools Play?
- 9. FAQ: Installing Windows With A Flash Drive
- 9.1. Can I Install Windows 10 Or Windows 11 With This Method?
- 9.2. Do I Need A Product Key To Install Windows?
- 9.3. What If My Computer Doesn’t Recognize The USB Drive?
- 9.4. Can I Use The Same USB Drive For Multiple Installations?
- 9.5. What Should I Do If The Installation Gets Stuck?
- 9.6. How Do I Know If My System Is Compatible With Windows 11?
- 9.7. Can I Dual Boot Windows With This Method?
- 9.8. What If I Don’t Have A Windows ISO File?
- 9.9. How Much Storage Space Do I Need On The USB Drive?
- 9.10. What Is The Best Way To Back Up My Data Before Installation?
- 10. Call To Action
1. What Is A Flash Drive Windows Installation And Why Is It Useful?
A flash drive Windows installation is a method of installing the Windows operating system using a USB flash drive instead of a traditional CD or DVD, offering convenience, speed, and compatibility, essential for modern automotive repair technicians who need to quickly update or repair systems. Flash drive installations are faster due to the higher data transfer rates of USB drives compared to optical discs. Flash drives are also more durable and portable, making them ideal for on-the-go technicians. Moreover, many modern computers, especially laptops and tablets, no longer come with optical drives, making USB installation the only option. The ease of creating a bootable USB drive and its universal compatibility make it a preferred method for installing Windows in diverse environments, including automotive repair shops.
1.1. What Are The Benefits Of Using A Flash Drive For Windows Installation?
Using a flash drive for Windows installation provides numerous advantages. These include faster installation times, increased portability, and greater compatibility with modern hardware.
- Speed: Flash drives offer significantly faster data transfer rates than DVDs, reducing installation time.
- Portability: Flash drives are compact and easy to carry, making them convenient for technicians on the move.
- Compatibility: Many new computers lack DVD drives, making flash drives the only viable installation method.
- Durability: Flash drives are more resistant to physical damage compared to DVDs.
- Reusability: A single flash drive can be used multiple times for different installations, saving costs.
1.2. What Are The Drawbacks Of Using A Flash Drive For Windows Installation?
While using a flash drive for Windows installation is beneficial, there are a few potential drawbacks. These include the need for a working USB port, the risk of data loss if the drive is not handled carefully, and compatibility issues with older systems.
| Drawback | Description |
|---|---|
| USB Port Dependency | Requires a functioning USB port on the target computer. |
| Data Loss Risk | Improper handling or accidental formatting can lead to data loss. |
| Compatibility Issues | Older systems might not support booting from USB drives. |
| Drive Corruption | Flash drives can be susceptible to corruption, rendering the installation media unusable. |
| Boot Order | BIOS settings might need adjustment to prioritize USB booting, which can be confusing for some users. |
2. What Do You Need To Install Windows With A Flash Drive Without Software?
To install Windows with a flash drive without additional software, you need a Windows ISO file, a USB flash drive with sufficient storage capacity (at least 8 GB), and the ability to access the BIOS settings of the computer on which you are installing Windows. This method leverages the built-in tools within Windows to prepare the flash drive, making it bootable. Ensuring you have these elements ready streamlines the installation process, allowing for a smooth and efficient setup.
2.1. How To Download A Windows ISO File?
Downloading a Windows ISO file can be accomplished through the Microsoft website. Here’s how:
- Visit the Microsoft Windows Download page.
- Choose the version of Windows you want to download (e.g., Windows 10, Windows 11).
- Follow the prompts to download the Media Creation Tool.
- Run the Media Creation Tool and select “Create installation media for another PC.”
- Choose “ISO file” as the media to use, and the tool will download the ISO file to your specified location.
2.2. How To Prepare A USB Flash Drive For Windows Installation?
To prepare a USB flash drive for Windows installation:
- Insert the USB flash drive into your computer.
- Open Command Prompt as an administrator.
- Type
diskpartand press Enter. - Type
list diskto see a list of available disks. - Identify the disk number of your USB flash drive.
- Type
select disk X(replace X with the disk number of your USB drive) and press Enter. - Type
cleanand press Enter to remove all data from the drive. - Type
create partition primaryand press Enter. - Type
select partition 1and press Enter. - Type
activeand press Enter. - Type
format fs=fat32 quickand press Enter to format the drive. - Type
assignand press Enter to assign a drive letter. - Type
exitto close Diskpart. - Mount the downloaded Windows ISO file and copy all files to the prepared USB flash drive.
This process ensures that the USB drive is bootable and ready to install Windows.
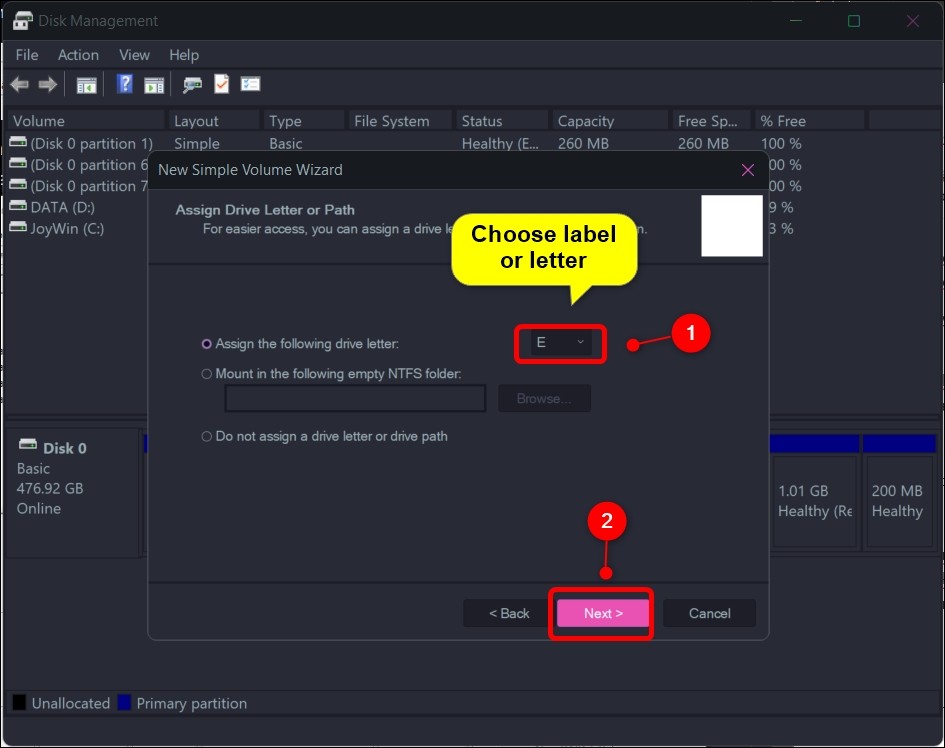 Preparing a USB flash drive for Windows installation
2.3. What Are The Minimum System Requirements For Installing Windows?
The minimum system requirements for installing Windows vary depending on the version, but generally include:
| Component | Windows 10 | Windows 11 |
|---|---|---|
| Processor | 1 GHz or faster | 1 GHz or faster with 2 or more cores |
| RAM | 1 GB (32-bit) or 2 GB (64-bit) | 4 GB |
| Storage | 16 GB (32-bit) or 20 GB (64-bit) | 64 GB or larger storage device |
| Graphics Card | DirectX 9 compatible with WDDM 1.0 driver | DirectX 12 compatible graphics card / WDDM 2.x |
| Display | 800 x 600 resolution | >9″ with HD Resolution (720p) |
| System Firmware | UEFI capable | UEFI, Secure Boot capable |
| TPM | Not required | Trusted Platform Module (TPM) version 2.0 |
| Microsoft Account | Required for some features | Required for initial setup |
| Internet Connection | Required for updates and some features | Required for Windows 11 Home edition initial setup |
Ensuring your system meets these requirements guarantees a smooth installation process.
3. Step-By-Step Guide: How To Install Windows With A Flash Drive Without Software?
To install Windows with a flash drive without needing extra software, follow these detailed steps. This process involves preparing the flash drive, booting from it, and completing the installation.
3.1. How To Boot From The USB Flash Drive?
- Insert the prepared USB drive: Plug the USB flash drive into the computer on which you want to install Windows.
- Restart the computer: Reboot the system to enter the BIOS settings.
- Access BIOS settings: During startup, press the appropriate key (usually Del, F2, F12, Esc, or another key specified by your computer manufacturer) to enter the BIOS setup.
- Navigate to the Boot Options: Use the arrow keys to navigate to the “Boot” or “Boot Options” section.
- Set USB as the first boot device: Change the boot order to prioritize the USB drive. This ensures the computer boots from the USB drive instead of the hard drive.
- Save and exit: Save the changes and exit the BIOS setup. The computer will restart.
- Boot from USB: The computer will now boot from the USB drive, starting the Windows installation process.
3.2. How To Start The Windows Installation Process?
- Boot from USB: After setting the USB drive as the primary boot device, restart your computer. It should now boot from the USB drive.
- Windows Setup: The Windows Setup screen will appear. Choose your language, time, and keyboard settings, then click “Next.”
- Install Now: Click the “Install Now” button to begin the installation process.
- Product Key: If prompted, enter your Windows product key. If you don’t have one or are reinstalling Windows, you can usually skip this step and enter it later.
- License Terms: Accept the license terms and click “Next.”
- Installation Type: Choose “Custom: Install Windows only (advanced).” This option allows you to select the partition where you want to install Windows.
- Select Partition: Select the partition where you want to install Windows. If you are installing on a new drive, you may need to create a new partition. Follow the on-screen instructions to format the selected partition, then click “Next.”
- Installation: Windows will now begin installing. This process may take some time, and your computer will restart several times.
- Initial Setup: After the installation is complete, Windows will restart and guide you through the initial setup process, including setting up your account, privacy settings, and network connections.
3.3. How To Configure BIOS Settings For USB Boot?
Configuring BIOS settings to boot from USB is crucial for installing Windows from a flash drive. The BIOS (Basic Input/Output System) is the firmware that controls the initial startup processes of your computer. Accessing and modifying these settings allows you to prioritize the USB drive as the boot device. Here’s how to do it:
- Restart Your Computer: Begin by restarting the computer you intend to install Windows on.
- Enter BIOS Setup: As the computer starts, watch for a prompt indicating which key to press to enter the BIOS setup. Common keys include
Del,F2,F12,Esc, or other keys specified by your computer manufacturer. Press the indicated key to enter the BIOS setup utility. - Navigate to Boot Options: Once in the BIOS setup, use the arrow keys to navigate to the “Boot,” “Boot Options,” or “Boot Order” section. The exact name and location of this section may vary depending on your BIOS version and motherboard manufacturer.
- Change Boot Order: Look for a list of boot devices. Your hard drive is usually listed first. Change the boot order to prioritize the USB drive. This ensures that the computer attempts to boot from the USB drive before any other device. You might see the USB drive listed as “Removable Devices,” “USB-HDD,” or by its specific brand name.
- Save Changes and Exit: After setting the USB drive as the first boot device, navigate to the “Exit” section. Choose the option to “Save Changes and Exit.” Confirm the changes if prompted.
- Restart and Boot from USB: The computer will restart. If the USB drive is properly prepared with the Windows installation files, the computer should now boot from the USB drive, initiating the Windows installation process.
4. What Are The Best Practices For A Smooth Installation?
For a smooth Windows installation, consider these best practices:
- Backup important data: Before beginning, back up all essential files to prevent data loss.
- Ensure a stable power supply: Use a laptop with a fully charged battery or connect a desktop to a UPS.
- Disable unnecessary peripherals: Disconnect printers, external hard drives, and other USB devices.
- Update BIOS if necessary: An outdated BIOS can cause compatibility issues.
- Use a reliable USB drive: A high-quality USB drive minimizes the risk of data corruption.
- Double-check ISO file integrity: Ensure the downloaded ISO file is complete and not corrupted.
- Follow instructions carefully: Read and understand each step before proceeding.
- Be patient: The installation process can take time, so avoid interrupting it.
4.1. How To Avoid Common Installation Errors?
Avoiding common installation errors is essential for a smooth Windows setup. Here’s how to handle frequent issues:
- Check Hardware Compatibility:
- Issue: Incompatible hardware can halt the installation.
- Solution: Ensure your system meets the minimum requirements and that all hardware is compatible with the version of Windows you’re installing. Check the manufacturer’s website for driver updates.
- Corrupted ISO File:
- Issue: A corrupted ISO file can lead to installation failures.
- Solution: Download the ISO file again from the official Microsoft website to ensure it’s complete and error-free.
- USB Drive Issues:
- Issue: Problems with the USB drive can cause installation interruptions.
- Solution: Use a high-quality USB drive and reformat it properly using the Diskpart tool. Make sure the drive is not physically damaged.
- Incorrect BIOS Settings:
- Issue: Improper BIOS settings can prevent the system from booting from the USB drive.
- Solution: Access the BIOS settings and ensure that the USB drive is set as the first boot device. Disable Secure Boot if necessary.
- Driver Problems:
- Issue: Driver issues can arise during or after installation.
- Solution: Download the latest drivers for your hardware from the manufacturer’s website and have them ready to install after Windows is set up.
- Partitioning Errors:
- Issue: Incorrect partitioning can lead to installation failures.
- Solution: Use the Windows installation tool to create, format, and select the appropriate partition. Be careful when deleting or modifying existing partitions to avoid data loss.
- Activation Issues:
- Issue: Problems with product key activation can prevent full use of Windows.
- Solution: Ensure you have a valid product key and enter it correctly. If you’re reinstalling Windows, it should activate automatically if it was previously activated on the same hardware.
- Power Interruptions:
- Issue: Power loss during installation can cause severe errors.
- Solution: Use a laptop with a fully charged battery or connect your desktop to a UPS (Uninterruptible Power Supply).
- Insufficient Disk Space:
- Issue: Not enough disk space can halt the installation process.
- Solution: Ensure that the target drive has enough free space to install Windows. Delete unnecessary files or use a larger drive.
- Overheating:
- Issue: Overheating can cause the system to shut down during installation.
- Solution: Ensure that the computer has adequate cooling. Clean any dust from the fans and vents.
4.2. How To Troubleshoot Common Problems During Installation?
Troubleshooting common installation problems can save time and prevent frustration. Here are some steps to resolve frequent issues:
| Problem | Solution |
|---|---|
| Installation gets stuck | Wait patiently, as some steps take longer. If it remains stuck for an extended period, restart the computer and try again. Check the ISO file integrity. |
| Computer doesn’t boot from USB | Ensure the USB is correctly set as the first boot device in BIOS. Disable Secure Boot if necessary. Try a different USB port. |
| Error messages appear during installation | Note the error message and search online for solutions. Common errors include driver issues, corrupted files, or hardware incompatibility. |
| Windows cannot be installed to this disk | This may be due to partition issues. Use the installation tool to delete existing partitions and create new ones, or format the drive. Ensure the disk is compatible with the installation. |
| Activation fails | Double-check the product key. Ensure you have an internet connection for online activation. If reinstalling, Windows should activate automatically if it was previously activated on the same hardware. |
| Missing drivers | After installation, install missing drivers from the manufacturer’s website. Use Device Manager to identify devices with missing drivers. |
| System freezes or crashes | This could be due to hardware issues. Check RAM, CPU, and GPU for proper functioning. Ensure adequate cooling to prevent overheating. |
5. What Are The Alternatives To Installing Windows With A Flash Drive?
While installing Windows with a flash drive is popular, alternatives include using a DVD, network installation, and virtual machines.
5.1. How To Install Windows Using A DVD?
To install Windows using a DVD:
- Burn the ISO file to a DVD: Use a DVD burning tool to create a bootable DVD from the Windows ISO file.
- Insert the DVD: Place the DVD into the optical drive of the computer.
- Boot from DVD: Restart the computer and enter the BIOS settings. Set the DVD drive as the first boot device.
- Follow the on-screen instructions: The Windows installation process will begin. Follow the prompts to complete the installation.
5.2. How To Perform A Network Installation Of Windows?
Performing a network installation of Windows involves deploying the operating system over a local network, typically used in enterprise environments. This method requires a preconfigured server with the Windows installation files and appropriate network settings.
- Set Up a Deployment Server:
- Windows Deployment Services (WDS): Use WDS on a Windows Server to manage and deploy Windows images.
- Configuration: Configure WDS with the Windows installation files (ISO) and create boot images.
- Configure Client Computers:
- Network Boot: Ensure that the client computers are configured to boot from the network (PXE boot). This option is usually found in the BIOS settings.
- Boot from Network:
- Restart Client: Restart the client computer and allow it to boot from the network. The client should receive an IP address from the DHCP server and connect to the WDS server.
- Select Boot Image:
- Choose Installation: The client will display a boot menu, allowing you to select the Windows installation image.
- Installation Process:
- Follow Prompts: Follow the on-screen prompts to complete the Windows installation. This process is similar to installing from a USB or DVD, but the files are accessed over the network.
6. How Can CAR-REMOTE-REPAIR.EDU.VN Help Automotive Technicians With Their Tech Skills?
CAR-REMOTE-REPAIR.EDU.VN offers specialized training programs tailored to enhance the tech skills of automotive technicians, focusing on modern diagnostic and repair techniques. By leveraging remote technologies, technicians can gain expertise in areas such as ECU programming, remote diagnostics, and advanced troubleshooting. This training ensures that technicians stay current with the latest automotive technologies, improving their efficiency and service quality.
6.1. What Remote Diagnostic Training Does CAR-REMOTE-REPAIR.EDU.VN Offer?
CAR-REMOTE-REPAIR.EDU.VN provides comprehensive remote diagnostic training, covering essential aspects such as:
- Remote Access Tools: Training on using remote access software to diagnose and repair vehicles from a distance.
- ECU Programming: Instruction on programming and configuring Engine Control Units (ECUs) remotely.
- Diagnostic Software: Training on using various diagnostic software platforms to identify and resolve vehicle issues.
- Troubleshooting Techniques: Advanced techniques for troubleshooting complex automotive problems remotely.
- Real-World Scenarios: Practical exercises and case studies to apply learned skills in real-world scenarios.
6.2. How Does CAR-REMOTE-REPAIR.EDU.VN Support Remote Automotive Repairs In The USA?
CAR-REMOTE-REPAIR.EDU.VN supports remote automotive repairs in the USA by offering:
- Training Programs: Comprehensive training programs designed to equip technicians with the skills needed to perform remote diagnostics and repairs.
- Technical Support: Expert technical support to assist technicians with challenging remote repair tasks.
- Software and Tools: Access to advanced diagnostic software and remote access tools.
- Certification: Certification programs to validate technicians’ skills and knowledge in remote automotive repair.
- Community Forum: A community forum for technicians to share knowledge, ask questions, and collaborate on solutions.
By providing these resources, CAR-REMOTE-REPAIR.EDU.VN empowers automotive technicians to deliver efficient and effective remote repair services across the USA.
 CAR-REMOTE-REPAIR services in action
7. Case Studies: Successful Windows Installations In Automotive Repair Shops
To illustrate the effectiveness of using flash drives for Windows installations, let’s examine a few case studies from automotive repair shops.
7.1. Case Study 1: Speeding Up Diagnostic Software Installation
Challenge: An automotive repair shop needed to update diagnostic software on multiple computers quickly. The traditional DVD installation method was time-consuming.
Solution: The shop created bootable USB drives for each computer. The installation time was reduced from 45 minutes per computer to just 20 minutes.
Outcome: The shop saved significant time, allowing technicians to focus on vehicle repairs more efficiently.
7.2. Case Study 2: Recovering A Corrupted System In A Mobile Repair Unit
Challenge: A mobile repair unit’s laptop crashed due to a corrupted operating system. The technician needed to reinstall Windows quickly in the field.
Solution: The technician used a pre-loaded USB drive to reinstall Windows. The process was completed in under an hour, minimizing downtime.
Outcome: The mobile repair unit was back in service quickly, preventing loss of revenue and customer dissatisfaction.
7.3. Case Study 3: Upgrading An Older System To Windows 10
Challenge: An automotive repair shop wanted to upgrade an older computer to Windows 10 but lacked a DVD drive.
Solution: The shop created a bootable USB drive to install Windows 10. The installation was straightforward, and the computer was ready for use with new diagnostic tools.
Outcome: The shop was able to modernize its equipment without needing to purchase new hardware, saving costs and improving capabilities.
8. What Are The Future Trends In Windows Installation For Automotive Repair?
Future trends in Windows installation for automotive repair include increased use of cloud-based solutions, automated deployment tools, and enhanced security measures.
8.1. How Will Cloud-Based Installation Impact Automotive Techs?
Cloud-based installations will allow automotive technicians to access and install Windows and diagnostic software directly from the cloud, reducing the need for physical media. This approach offers:
- Accessibility: Technicians can access installation files from anywhere with an internet connection.
- Updates: Software updates are automatically managed, ensuring technicians always have the latest versions.
- Scalability: Easily deploy software to multiple devices without physical media.
- Cost Savings: Reduced costs associated with purchasing and managing physical installation media.
8.2. What Role Will Automated Deployment Tools Play?
Automated deployment tools will streamline the Windows installation process, allowing technicians to quickly and efficiently set up multiple computers with minimal manual intervention. These tools can:
- Reduce Time: Automate the installation process, saving time and effort.
- Consistency: Ensure consistent configurations across all devices.
- Centralized Management: Manage and monitor installations from a central location.
- Error Reduction: Minimize the risk of human error during installation.
9. FAQ: Installing Windows With A Flash Drive
Here are some frequently asked questions about installing Windows with a flash drive:
9.1. Can I Install Windows 10 Or Windows 11 With This Method?
Yes, you can install both Windows 10 and Windows 11 using a flash drive, provided your system meets the minimum requirements for the respective operating system.
9.2. Do I Need A Product Key To Install Windows?
A product key is required for activating Windows. If you are reinstalling Windows on a device that was previously activated, it may automatically activate without needing to enter the key again.
9.3. What If My Computer Doesn’t Recognize The USB Drive?
Ensure the USB drive is properly formatted and bootable. Check the BIOS settings to make sure USB boot is enabled and prioritized. Try using a different USB port.
9.4. Can I Use The Same USB Drive For Multiple Installations?
Yes, you can reuse the same USB drive for multiple installations. After each installation, you can reformat the drive and copy a new Windows ISO file onto it.
9.5. What Should I Do If The Installation Gets Stuck?
Wait patiently, as some installation steps take time. If it remains stuck for an extended period, restart the computer and try again. Check the ISO file integrity.
9.6. How Do I Know If My System Is Compatible With Windows 11?
Use the PC Health Check app provided by Microsoft to check if your system meets the minimum requirements for Windows 11.
9.7. Can I Dual Boot Windows With This Method?
Yes, you can create a dual boot system by installing Windows on a separate partition. During the installation process, select the option to install Windows on a new partition.
9.8. What If I Don’t Have A Windows ISO File?
You can download a Windows ISO file from the Microsoft website using the Media Creation Tool.
9.9. How Much Storage Space Do I Need On The USB Drive?
You need at least 8 GB of storage space on the USB drive for installing Windows. A 16 GB or larger drive is recommended.
9.10. What Is The Best Way To Back Up My Data Before Installation?
Use an external hard drive or cloud storage service to back up your important files before starting the installation process.
10. Call To Action
Ready to enhance your automotive tech skills? Visit CAR-REMOTE-REPAIR.EDU.VN today to explore our comprehensive training programs and expert technical support. Stay ahead in the rapidly evolving world of automotive technology! Contact us at Address: 1700 W Irving Park Rd, Chicago, IL 60613, United States or Whatsapp: +1 (641) 206-8880.